All you need for this workout is a dead ball and a workout mat. Choose a dead ball weight that feels challenging so that the last few reps of the exercise are more difficult to complete, but ensuring you can complete for the allocated amount of time. Focus on completing each exercise with correct form to help you gain the most benefit.
RELATED: We found the best adjustable dumbbells to kickstart fit girl summer
This express workout follows a circuit format which includes compound exercises designed to challenge major muscle groups including your quads, glutes, shoulders and core through a series of dynamic movements. Within the circuit, you will perform each of the six exercises for the specified amount of time, resting for 30-seconds at the end of each lap, completing three laps in total.
Warm up
Kelsey recommends taking a few minutes to warm-up prior to working out. 3-5 minutes of cardio, such as jumping jacks, along with some dynamic stretches such as leg swings and arm swings will help increase your heart rate and warm up your muscles ahead of your session. It will also help increase your range of motion and help to reduce your risk of injury.
12-minute full-body dead ball workout
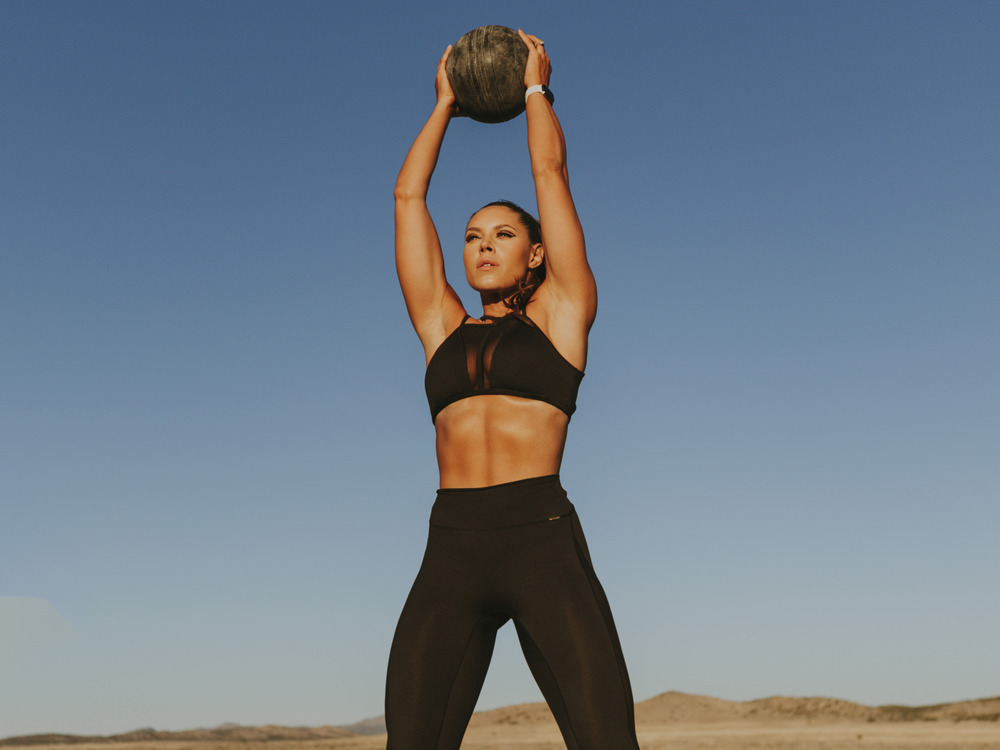
- Dead Ball Over the Shoulder Throw 30 seconds
- Dead Ball Scissor Kick 30 seconds
- Dead Ball Squat 30 seconds
- Dead Ball Alternating Pushup 30 seconds
- Dead Ball RDL 30 seconds
- Dead Ball Slam 30 seconds
- REST 30 seconds
- Repeat for 3 laps
Dead ball over the shoulder throw
- Step 1: Standing directly behind a dead ball, plant both feet on the floor shoulder-width apart, either side of the ball. This is your starting position.
- Step 2: Inhale. Looking straight ahead, bend at both the hips and knees, ensuring that your knees remain in line with your toes. Continue bending your knees until your upper legs are parallel with the floor. Ensure that your back remains between a 45- to 90-degree angle to your hips. At the same time, extend your arms below you to grasp the dead ball.
- Step 3: Exhale. Push through your heels and extend your legs to return to a standing position, ensuring that you maintain a neutral spine. At the same time, bend your elbows to bring the ball into your chest and using the muscles in your shoulders, raise the ball up and throw it over your right shoulder in one swift movement. Ensure to release the ball with enough force to allow it to clear your heels once released.
- Step 4: Inhale. Turn to face the ball and step towards it. Looking straight ahead, bend at both the hips and knees, ensuring that your knees remain in line with your toes. Continue bending your knees until your upper legs are parallel with the floor. Ensure that your back remains between a 45- to 90-degree angle to your hips. At the same time, extend your arms below you to grasp the dead ball.
- Step 5: Exhale. Push through your heels and extend your legs to return to a standing position, ensuring that you maintain a neutral spine. At the same time, bend your elbows to bring the ball into your chest and using the muscles in your shoulders, raise the ball up and throw it over your left shoulder in one swift movement. Ensure you release the ball with enough force to allow it to clear your heels once released. Repeat for the specified amount of time.
Dead ball scissor kick
- Step 1: Start by lying on your back on a yoga mat and hold the dead ball in both hands, directly above your chest. Engage your abdominal muscles by drawing your belly button in towards your spine and raise both legs off the floor. This is your starting position.
- Step 2: At the same time, slightly raise your right leg and slightly lower your left leg, ensuring that neither of your legs touch the floor. Keeping the dead ball raised in both hands above your chest.
- Step 3: At the same time, slightly raise your left leg and slightly lower your right leg, ensuring that neither of your legs touch the floor. This should create a “scissor-like” motion. Continue alternating between right and left for the specified amount of time.
Dead ball squat
- Step 1: Holding a dead ball with two hands to your chest, plant both feet on the floor slightly further than shoulder-width apart. This is your starting position.
- Step 2: Inhale. Looking straight ahead, bend at both the hips and knees, ensuring that your knees remain in line with your toes. Continue bending your knees until your upper legs are parallel with the floor. Ensure that your back remains within a 45- to 90-degree angle to your hips.
- Step 3: Exhale. Push through the heels of your feet and extend your legs to return to the starting position. Repeat for the specified amount of time.
Dead ball alternating pushup
- Step 1: With your right hand on a dead ball, place your left hand on a yoga mat so that your hands are slightly wider than your shoulders. Extend both legs behind you hip-width apart, resting on the balls of your feet. This is your starting position.
- Step 2: Inhale. While maintaining a straight back and stabilising through your abdominals, bend your elbows and lower your torso towards the floor until your left arm forms a 90-degree angle.
- Step 3: Exhale. Push through your chest and extend your arms to lift your body back into starting position.
- Step 4: Without moving your feet, release your left hand and place it on top of the dead ball next to your right hand. Release your right hand to place your hand on the mat to the right of the dead ball, ensuring that your hands are slightly wider than your shoulders.
- Step 5: Inhale. While maintaining a straight back and stabilising through your abdominals, bend your elbows and lower your torso towards the floor until your right arm forms a 90-degree angle.
- Step 6: Exhale. Push through your chest and extend your arms to lift your body back up.
- Step 7: Without moving your feet, release your right hand and place it on top of the dead ball next to your left hand. Release your left hand to place your hand on the mat to the left of the dead ball to return to the starting position, once again, ensuring that your hands are slightly wider than your shoulders. Continue alternating between left and right for the specified amount of time.
Dead ball RDL
- Step 1: Plant both feet on the floor shoulder-width apart. This is your starting position. Hold the dead ball in both hands directly in front of your chest. Bend your left knee slightly and set this as a fixed angle.Without changing the angle of your left knee, hinge forwards from your hips until your torso is parallel to the floor, extending your right leg behind you, ensuring that your toes point towards the floor. At the same time, extend your arms with the dead ball directly in front. Ensure that you keep your hips level, maintain a proud chest and that your head is an extension of your spine. You should feel tension in the back of your leg and glutes.
- Step 2: While maintaining the bent-over position, draw your elbows and right knee towards your chest in a crunch movement before reaching back out and extending into the full single-leg romanian deadlift position. Repeat for the specified number of time each side.
Dead ball slam
- Step 1: Holding a dead ball with both hands directly in front of your chest, plant both feet on the floor slightly further than shoulder-width apart. Point both feet slightly outward. This is your starting position.
- Step 2: Inhale. At the same time, extend your elbows to bring the dead ball up above your head and press into the balls of your feet to elevate your heels.
- Step 3: Exhale. Once your arms are fully extended above your head, bend your hips and knees until your upper legs are parallel with the floor and slam the dead ball into the floor as hard as you can. Return to the starting position. Repeat for the specified amount of time. .
Cool down
Kelsey recommends completing a cool down session after your workout. 3-5 minutes of walking will help to slowly lower your heart rate to normal levels and help your body to cool down after a workout. You might also like to complete some static stretching as part of your cool down, where you hold a single position for twenty seconds or longer. Static stretching works to lengthen your muscles with the aim of increasing your flexibility and range of motion.
Kelsey Wells is a Sweat trainer, Redefine Fitness podcast host, wife and mother. Kelsey is a certified personal trainer with additional expertise in post-natal training. Most of all, she is passionate about empowering women to strengthen their bodies, and feel amazing both inside and out. This workout is part of her new PWR Strength at Home program.